

Divya Stuti
Divya Stuti, with over 5 years of experience in Digital Marketing & Content Writing, has a knack for turning complex Marketing strategies, trends, and jargon...
Ever tried to open a website and it just refused to load, even though your internet is working fine? Super frustrating, right? You refresh, restart your router, and even yell at your screen — but nothing helps. Here’s the thing: the problem might be hiding inside your browser. Chrome stores a memory of websites you visit called the DNS cache.
Sometimes, that memory gets outdated or messy, and it blocks websites from loading properly. Network configurations and corrupted browser data may be the reason behind it. The good news? You can fix it in seconds using a hidden Chrome page: chrome://net-internals/#dns and clear error.
In this blog, I’ll show you exactly how to clear Chrome Net Internals DNS error without any technical skills. Follow the steps below for a smoother browsing experience.
What is Chrome Net Internals DNS Error?
A DNS error in Chrome happens when your browser can’t find the website you’re trying to visit. DNS stands for Domain Name System — it’s like the internet’s phonebook. It helps Chrome turn website names (like google.com) into IP addresses that computers understand.
When something goes wrong in this process, Chrome shows a DNS error. You might see messages like:
- “This site can’t be reached”
- “Server DNS address could not be found”
- “DNS_PROBE_FINISHED_NXDOMAIN”
These errors mean Chrome couldn’t figure out where the website lives on the internet. It can happen for a few reasons:
- Your DNS cache is outdated or corrupted
- The website’s DNS settings have changed
- Your internet connection has DNS issues
- There’s a problem with your DNS server
Clearing the DNS cache is a quick way to solve this. It forces Chrome to forget the old data and fetch fresh info. That often gets things working again in seconds.
Also Read: Search Google or Type a URL Feature 2025: Get Better & Faster Results
Steps to Clear Chrome Net Internals DNS Error
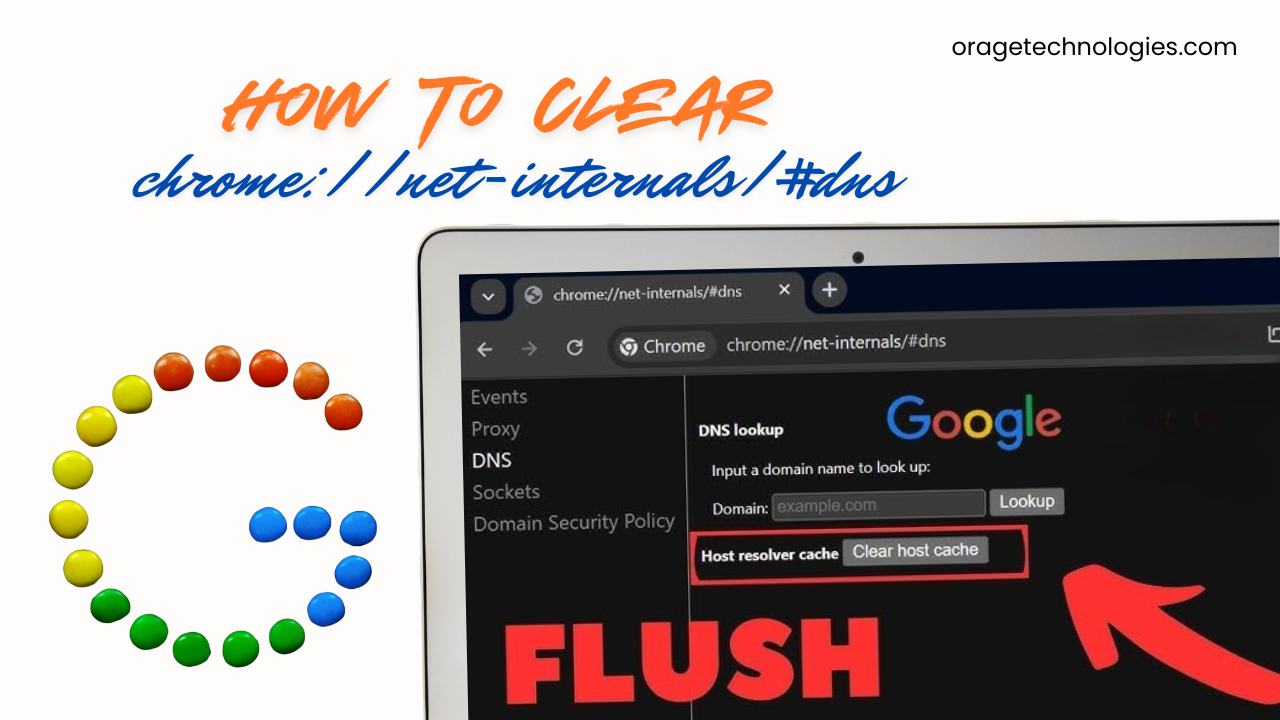
The built-in Google Chrome tool chrome://net-internals/#dns clear helps users manage network-related configurations such as DNS. If you are facing issues related to DNS cache, here is an easy-to-follow guide to troubleshoot the error.
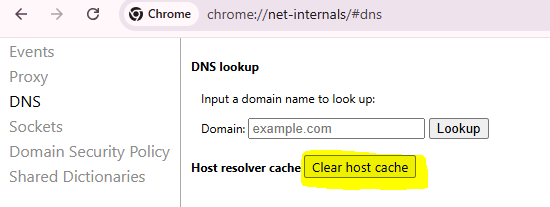
Step 1: Navigate to the hidden feature on the Chrome net internals page by searching “chrome://net-internals” in the search bar.
Step 2: You will be directed to the Net Internals page. On the left side menu or the dropdown, choose DNS and click on the “Clear Host Cache” button. Cache gets outdated and corrupt with time, and this may lead to certain errors. Following this step, you will be detailing all the cache saved by Chrome.
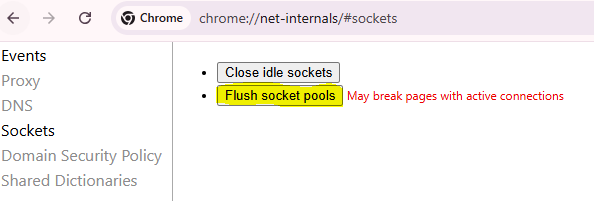
Step 3: The next step is to flush Chrome’s sockets so that the browser doesn’t use old or invalid connections. To flush sockets, switch to “Sockets” from the menu bar present on the net internals page and then click on “Flush Socket Pools”.
Step 4: Now that you have made the necessary changes, it’s time to make sure that all changes are implemented. To do this, you will have to restart Google Chrome. To restart, close the browser and open and try reloading the website again.
Following this step will deactivate all the active network connections. And Chrome now has to establish entirely new connections while accessing websites.
Alternative Troubleshooting Tips to Clear DNS Error
In most cases, clearing the DNS cache will resolve the issue. However, if you still face the error, you should try the following troubleshooting tips:
1. Clear Your System DNS Cache
Now, you might think that only browsers catch and store the cache. But this is not true, the operating system you choose.
The DNS cache is not limited to Chrome, your operating system also stores DNS records. Clearing the system DNS cache can help:
Windows:
In the command prompt, add:
Command:
bash
config /flushdns
After pressing “Enter”, you will get a confirmation message that the DNS Resolver Cache was flushed successfully.
macOS:
Go to the terminal and create the given command:
Command:
bash
sudo dscacheutil -flushcache
Now fill in your password and press Enter.
Linux:
Go to the terminal and type the command given below to restart the DNS service.
Command:
bash
sudo systemd-resolve –flush-caches
2. Reset Your Network Settings
DNS Errors can also occur due to network misconfiguration. You can resolve the error by resetting the network settings:
Windows:
Run the given command one by one:
bash
netsh winsock reset
netsh int ip reset
Now, after entering this command, restart your computer.
macOS:
- Navigate to System Preferences
- Choose Network
- Then Click on Advanced
- Now, remove the previous network configuration
- And add the current network configuration
3. Change DNS Servers
At times, Chrome Net Internals DNS Error may also happen because of the DNS Server offered by the ISP. You can switch to public DNS to resolve this issue.
Navigate to network settings and change the DNS servers to one of the following:
Google DNS
- Primary: 8.8.8.8
- Secondary: 8.8.4.4
Cloudflare DNS
- Primary: 1.1.1.1
- Secondary: 1.0.0.1
Now save the changes and restart your connections.
4. Clear Browser Cache and Cookies
Another way to clear Chrome Net Internals DNS error is to remove unwanted entries from a corrupt browser. To resolve the issue, follow the given steps:
- In the setting, choose privacy and security, and clear browsing data
- Now choose cookies and other site data
Corrupted browser data can also cause DNS errors. To clear Chrome’s cache and cookies:
- In the settings option, select “Privacy and Security” and then click on “Clear browsing data.”
- Now choose “Cookies and other site data” and cached images and files
- Now hit on “Clear Data”
5. Temporarily Disable Firewall or Antivirus
Firewalls and antivirus software are known to protect your system from danger. But they can also block DNS requests. You can simply disable the firewall and antivirus to test. However, remember to reactivate the firewall and antivirus settings after the issue is resolved.
6. Check a Stable Internet Connection
Make sure the internet connection is stable. If it is not, reboot the router or modem and try restarting it. Now reconnect to the network.
Also Read: EasyShare: Complete Guide to Install And Use EasyShare APK 2025
Best Practices to Prevent DNS Errors
To prevent DNS errors in the future, you should follow the tips given below:
- Update Chrome on a regular basis to fix bugs and improve network stability
- Opt for reliable public DNS services such as Google DNS or Cloudflare DNS.
- Clear the DNS cache at regular intervals to prevent outdated and corrupt entries.
What is the Host Cache?
The host cache is a place that browsers and the operating system use to save the outcomes of searching for domain names. Each time you visit a site, your browser looks up the domain name (for example, www.example.com) and converts it into an IP address.
Thanks to chrome://net-internals/#dns clear, you do not need to repeat the IP search when you re-enter the site, since it is already in the cache. Though this speeds up your browsing, it can cause trouble if the stored data becomes old or damaged.
Why Clear the Host Cache?
Over time, some of the entries in the host cache may become outdated or damaged, which can cause trouble while browsing. Here are the main reasons why it is helpful to clear the host cache:
1. Fixing DNS Errors
If you have a DNS error, the website may try to retrieve the information from the wrong IP address, which could be in the cache. Deleting the host cache makes the browser use the most up-to-date IP address and fixes any trouble with connecting.
2. Resolving Website Loading Issues
At times, cached, outdated DNS records can cause websites to fail to load properly. Clear your Internet browser’s host cache to make sure the browser has the latest DNS information to display the site properly.
3. Improving Network Performance
Having a corrupted or crowded cache on the host can make exploring websites slower. The browser runs quickly after clearing the cache since it no longer has to handle old DNS requests.
4. Updating Website Changes
Should a website change its location or IP, your browser might nevertheless attempt to access the old data. By emptying your host cache, you get to see the website’s updates while enjoying strong network connections.
5. Enhancing Security
People’s computers can sometimes be steered to dangerous sites due to cyber attackers using DNS poisoning or spoofing. Clearing the cache on the host takes away questionable DNS information, which reduces the possibility of security dangers.
6. Refreshing Network Configurations
For example, when you settle network settings through updating DNS or changing your network, flushing the host cache ensures up-to-date changes will be loaded and not impacted by old data.
Final Thoughts
If you are wondering “how to clear Chrome Net Internals DNS error”, this blog has offered multiple ways to do that. Like if you’re fixing DNS issues or want to be sure your site is working properly, occasionally clearing your browsing history can keep your internet experiences smooth. If DNS problems persist, either adjust your DNS settings or reach out to your Internet service provider for help.
Also Read: Dropped Pins in Google Maps – How to Drop and Remove a Pin on Phone & Desktop
FAQs
Chrome://net-internals/#dns is a diagnostic tool in Google Chrome that is used to troubleshoot DNS and network-related issues.
When you clear the host cache in Chrome, you remove old, outdated, and corrupt DNS entries, helping the websites load faster.
Yes, when you clear the DNS cache, all the browser history is wiped out.
Divya Stuti, with over 5 years of experience in Digital Marketing & Content Writing, has a knack for turning complex Marketing strategies, trends, and jargon into interesting and easy to digest blog posts. Whether she’s breaking down the SEO, Social Media or decoding campaigns, Divya knows how to make marketing feel exciting and easy to understand. Armed with a sharp eye for strategy and a storyteller’s instinct, she writes with clarity, creativity, and just the right dose of wit.
More PostsRelated Posts

Divya Stuti
Divya Stuti, with over 5 years of experience in Digital Marketing & Content Writing, has a knack for turning complex Marketing strategies, trends, and jargon...

Divya Stuti
Divya Stuti, with over 5 years of experience in Digital Marketing & Content Writing, has a knack for turning complex Marketing strategies, trends, and jargon...