

Divya Stuti
Divya Stuti, with over 5 years of experience in Digital Marketing & Content Writing, has a knack for turning complex Marketing strategies, trends, and jargon...
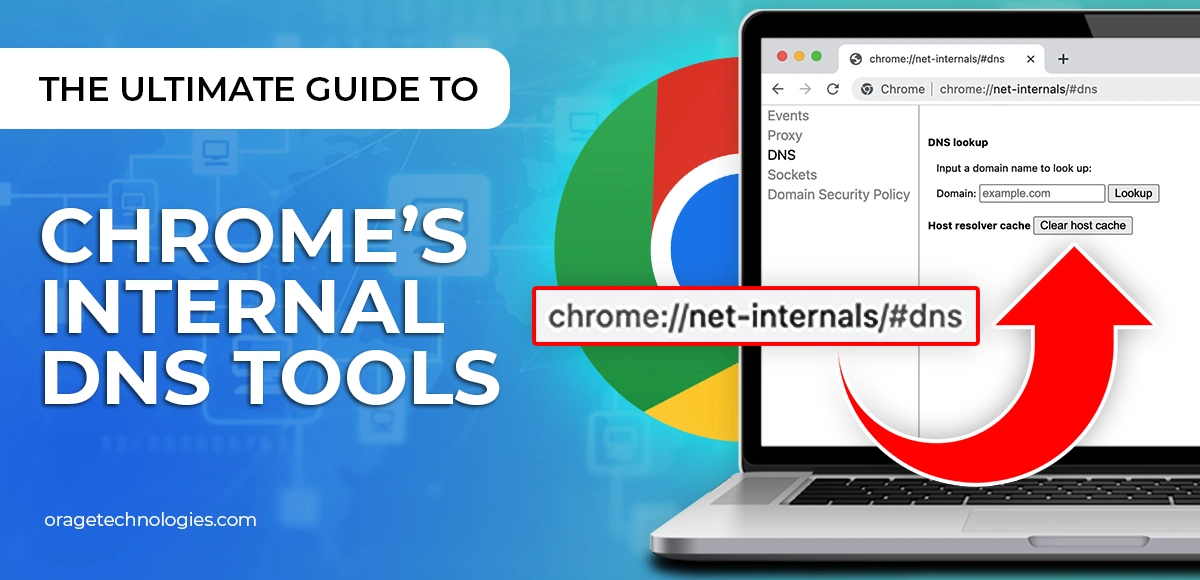
Domain Name System (DNS) is one of the fundamental systems of the Internet. It makes navigating the millions and billions of domains present on the internet easy and more accessible. In order to improve the browsing speed and resolve issues related to DNS and DNS caching, Google has introduced a built-in tool called Chrome Net Internals DNS. This tool is found at www.chromenetinternals.dns or chrome://net-internals/#dns.
Let’s take a deeper look at this magical tool and understand the features and benefits of Net Internals DNS.
What is Chrome Net Internals DNS?
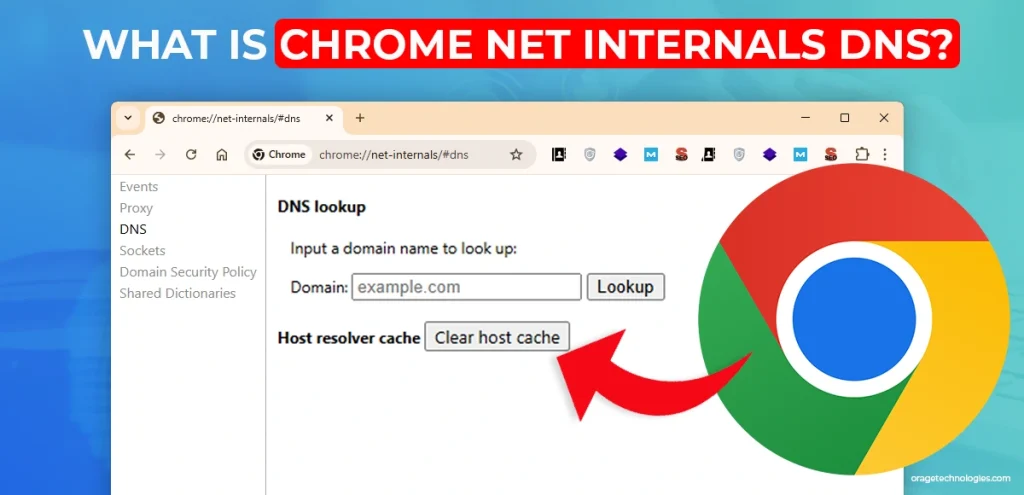
Chrome Net Internals DNS is a tool available on Google Chrome that provides you with an in-depth view of the browser’s DNS operations. Moreover, it also allows direct management of DNS-related settings. It is a useful tool that helps diagnose and resolve any DNS issue, which may lead to a lowering of speed or errors in accessing websites altogether.
Though this is primarily used on Chrome, it is a suite of network analysis tools that is also available for other networks, such as Opera and Microsoft Edge.
You can easily access the DNS settings page just by entering Chrome://net-internals/#dns on Chrome’s search bar, where you will get all the stored DNS data. From there, you can clear all the DNS Cache.
Also Read: Git Delete Local Branch: A Step-by-Step Guide For Developers
Features of Chrome Net Internals DNS Tools
As we now know, the “chrome://net-internals/#dns” page allows us to diagnose and resolve errors related to DNS settings. Here are some of its features you must know.
DNS Lookup
This is one of the key features offered by Chrome Net internals DNS. It helps users perform a DNS query for any domain. After the query is run successfully, the user will be able to view the IP address of that domain. This is a very vital feature when it comes to troubleshooting network connectivity errors. This allows us to know whether the DNS server is accessing the name correctly or not.
DNS Resolver Cache
The interface shows a list of saved DNS entries together with their Time-To-Live specifications. The provided information enables users to verify whether their system requires a new DNS cache update or is currently accessing domain names from the net internals DNS server cache.
DNS prefetching
Google Chrome makes use of this technique to increase web browsing speeds through link DNS entry prefetching on webpages. DNS prefetching produces faster web page loading speeds, but it leads to extra DNS queries, thus affecting network performance.
Sockets
The “chrome://net-internals/#dns” page showcases information about open network sockets alongside their state and exposes host and proxy resolver rules, which translate domain names into IP addresses and specify proxy servers for URLs.
How to use chrome://net-internals/#dns to clear the DNS cache on Windows?
You can use the Chrome://net-internals/#dns interface to flush DNS cache data inside the Chrome browser.
The built-in DNS cache clearing interface in Google Chrome browser can be accessed through chrome://net-internals/#dns, which allows users on Windows, macOS, or Linux systems to perform maintenance. Chrome features a built-in utility that clears stored DNS records through its #dns interface to address network connectivity problems.
Follow these steps to flush Net Internals DNS:
Step 1: Open your Chrome Browser
Step 2: Open chrome://net-internals/#dns by entering it in the Chrome address bar and pressing “Enter” to display the interface.

Step 3: Click the Chrome Net Internals DNS clear host cache button as indicated by the presented image.

Step 4: Restart Chrome before navigating to the socket pool clearing interface at chrome://net-internals/#sockets.

You accomplished the DNS cache clearing process in Chrome. The platform and device universal compatibility allows you to execute this method across Windows, macOS, Linux, Android, and iOS devices that include iPhone and iPad.
How to use chrome://net-internals/#dns to clear the DNS cache on Mobile?
This tool functions as a top-level diagnostic instrument for mobile devices to empty DNS cache information across all Android and iPhone, and iPad platforms.
The process to delete the host cache operating in Chrome net-internals DNS produces confusion on mobiles. The approach to resolve this issue proves to be basic and unhampered.
The process to clear the host cache requires the same procedure described previously. Users can activate the Chrome browser on their mobile devices with Android, iPhone, or iPad operating systems to reach chrome://net-internals/#dns for clearing the host cache.
Follow these Steps to Clear the Cache:
Step 1: Go to the Chrome browser.
Step 2: Click on the “More” button present at the top right corner of the screen.
Step 3: Tap on “History” from the list displayed.

Step 4: Now, set the time range, or you can simply click on “All Time” to clear all browsing data.

Step 5: Check the boxes for “Cookies and site data” and “Cached images and files.”

Step 6: Click on the “Clear data” button present at the bottom of the screen.
Why Should You Clear the Net Internals DNS Cache?
DNS Cache clearing is very important for everyone who uses the internet. This is because over time, DNS cache accumulates piles of outdated and incorrect data, and this can lead to the following things:
- Slowing down of the website
- The older version appears
- Connectivity and security issues.
Clearing the DNS Cache will help you speed up your browsing experience, strengthen your security, and offer the most updated results.
What to do if chrome://net-internals/#dns doesn’t work?
The Chrome Net Internals DNS may fail at certain places. And if you encounter such an issue, you can try using DNS flushing methods. Some of the DNS Flushing methods are:
1) Purge DNS cache using Command Prompt
2) By Restarting the DNS Client Service
3) By Resetting Chrome Flags
Check out each one in detail:
1. Purge DNS Cache Using the Command Prompt
If you are a Windows, macOS, or Chrome user, you can clear the DNS Cache very easily by following the given steps:
For Windows Users
Step 1: Navigate to the Start Menu > look for “Command Prompt” > Right Click > Click on “Run as Administrator“.
Step 2: A command prompt will appear on the screen.
Step 3: Type the given command and click Enter.
For macOS Users
Step 1: Open the Terminal application on the Mac.
Step 2: Type the given command and click the Return Key.

Step 3: Fill in the password and again click the return key.
Step 4: Lastly, open the browser and access the website.
2. Resetting DNS Client Services
The next method for DNS Flushing is resetting DNS client services. This method can be done in two ways:
Method 1: Go to the Command Prompt window and use the shortcut command Windows Key+R.

Now, a terminal will open. Here type services.msc and hit Enter. In the local services page, search for the DNS Client service. Do a Right Click and hit Restart. This will refresh the DNS Cache and resolve any issues.

Method 2: The second method can be simply searching for cmd in the Run Dialog. This will open the Command Prompt. Now type the command and refresh the cache.
4. Resetting Chrome Flags
The last method is resetting Chrome flags. These are an experimental feature in Google Chrome. By default, they are disabled. However, you can enable it for testing purposes. But be cautious, as this may trigger a certain enable chrome flags DNS_PROBE_FINISHED_NXDOMAIN error.
Follow these easy steps:
Step 1: Go to the Chrome browser
Step 2: Now, type chrome://flags in the address bar and hit Enter.
Step 3: Search “Reset all to default” button, present at the top of the page, and click on it.

Step 4: Next, a prompt will appear on the screen to confirm the reset. Hit on “Reset all”.
Step 5: Now your reset will be complete. You will be prompted to relaunch Chrome. This will apply the changes.
Flushing DNS Cache on MacOS
Step 1: Type and hit “Terminal” into Spotlight
Step 2: Navigate to the Terminal window and type the following command:
- sudo dscacheutil -flushcache
- sudo killall -HUP mDNSResponder
Flushing DNS cache on Linux
You can easily flush the net internals DNS cache on Linux by following these steps:
Step 1: Go to the terminal on the Linux system.
Step 2: Type the command “sudo systemd-resolve– flush-caches” and hit Enter.
Step 3: This will flush out both the negative as well as positive DNS cache entries.
Step 4: To verify cache clearing, type the command sudo systemd-resolve– statistics and hit Enter.
This will lead to statistics related to the resolved DNS queries. If the cache is cleared successfully, the count of “CacheHit” will be zero.
Pros and Cons of Chrome Net Internal DNS
Everything has a positive as well as a negative side; chrome//net-internals/#dns also has some of the cons that you should know.
| Pros | Cons |
| DNS cache clearing helps in resolving the website loading speed | Removes stored domain and IP addresses |
| Resolves various DNS-related network issues | Takes time to rebuild the cache |
| Short time duration | Challenging settings for a new user |
| A trustworthy and built-in tool in Google Chrome | Incorrect action can cause data loss |
Troubleshooting Common DNS Errors
Sometimes, clearing Chrome’s DNS cache using chrome://net-internals/#dns might not work immediately, or you might encounter situations where websites still fail to load after the process. In that case, apply these troubleshooting steps.
DNS Cache Not Clearing
If the Chrome net internals DNS clear host cache button doesn’t seem to have any effect, try restarting the Chrome browser itself. If the issue persists, a full restart of your computer or mobile device can sometimes resolve underlying system-level issues.
As discussed earlier, clearing the system’s DNS cache is another crucial step to ensure that outdated DNS information is completely removed. Finally, using Chrome’s Incognito Mode can help determine if a browser extension is interfering with the DNS management process.
If the problem doesn’t occur in Incognito Mode, try disabling your extensions one by one to identify the culprit.
Websites Not Loading After DNS Clear
If a website is still not loading even after you’ve cleared Chrome’s DNS cache, the first thing to check is your internet connection. Ensure that you are properly connected to your network, and the internet service is working.
Restarting your router can also often resolve temporary connectivity issues. If the problem persists, consider temporarily switching to a different DNS provider, such as Google DNS (8.8.8.8) or Cloudflare DNS (1.1.1.1), to rule out any issues with your current DNS servers.
Best Practices for Managing DNS in Chrome
To ensure a smooth and efficient browsing experience in Chrome, consider adopting the following DNS management operation.
- Clear your DNS cache periodically
While the frequency might vary, regularly clearing your DNS cache can help prevent browsing issues caused by outdated information.
- Utilize chrome://net-internals/#dns and the “Clear host cache” button:
This is the primary method for refreshing Chrome’s net internal DNS information on both desktop and mobile platforms.
- Flush socket pools when necessary
If simply clearing the DNS cache doesn’t resolve persistent connection problems, especially after a website update or migration, flushing the socket pools can be a helpful supplementary step.
- Keep your operating system updated
System updates often include fixes and improvements related to networking and DNS resolution, contributing to a more stable browsing environment.
- Consider using a secure and fast DNS provider
Exploring alternative DNS servers like Google DNS or Cloudflare DNS can potentially enhance your browsing speed, reliability, and security.
By following these practices, you can proactively and effectively manage potential DNS-related issues and enjoy a more seamless and speedy online experience.
Conclusion
Chrome Net Internals DNS settings and errors can often be challenging. But by using Chrome://net-internals/dns, users can effectively clear the cache, delete history, and troubleshoot various connection issues. Try DNS flushing methods if this doesn’t work.
Also Read: 13 Cybersecurity Best Practices for Your Business
FAQs
The Google Chrome browser contains Chrome Net internals DNS as a tool that enables users to view DNS cache settings. It also allows users to manage other related network configuration parameters.
Clearing DNS cache in Chrome is an easy process. Follow the given steps: Open your Chrome browser, then enter “chrome://net-internals/#dns” in the address bar, followed by pressing Enter. After entering the Chrome net internals DNS clear host cache section.
Open Chrome on your device, tap More at the top right corner, and select History. Choose time range and select Clear browsing data, then select Cookies and site data, Cached images and files, and clear data.
Divya Stuti, with over 5 years of experience in Digital Marketing & Content Writing, has a knack for turning complex Marketing strategies, trends, and jargon into interesting and easy to digest blog posts. Whether she’s breaking down the SEO, Social Media or decoding campaigns, Divya knows how to make marketing feel exciting and easy to understand. Armed with a sharp eye for strategy and a storyteller’s instinct, she writes with clarity, creativity, and just the right dose of wit.
More PostsRelated Posts

Divya Stuti
Divya Stuti, with over 5 years of experience in Digital Marketing & Content Writing, has a knack for turning complex Marketing strategies, trends, and jargon...

Divya Stuti
Divya Stuti, with over 5 years of experience in Digital Marketing & Content Writing, has a knack for turning complex Marketing strategies, trends, and jargon...